
It's the middle of July!! Yikes!! I still have a lot to do! One of the things I have to get moving on is drying the herbs for winter use. I grow a lot of herbs for the ktichen and to use medicinally. That is lemon balm drying on a screen above.
I prefer to dry them naturally, in the outside air, rather then use a dehydrator, oven or microwave. I have read a lot of bad things about drying herbs in the microwave. Many sites say the microwave partially cooks the herbs and doesn't leave a lot of the natural oils intact, so I am staying away from that. This is much easier anyway. Even though it takes longer to achieve the desired result, it's not MY time being used, so I don't mind.

This is yarrow drying on a couple of screens. I have a lot of screens for drying things since I have an online seed store. The screens are a great way to dry seeds and herbs. I am hoping to get all the herbs dried before I need to start drying large amounts of seeds on them. I need more screens!
 I can also hang herbs to dry. A few years ago I strung wire under our large porch. This is only half of it. There are three strands that run the entire lengh. They are high underneath the roof so out of the sun, wind and weather. Half of our porch is enclosed with glass above the chair rail and this is where the screens are set up, also out of the wind and weather but they do get the morning sun for a short time. They get air circulation from the open part under the chair rail. It's a good set up for drying things, unless the raccoons pay me a visit. (They come by occasionally just to tear things up a bit and keep me from becoming too complacent.)This is also where we plan to hang the tobacco to dry this year.
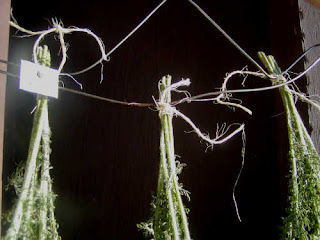 I tie the herb stems to coat hangers and hand those up onto the wires with my handy hooked stick. I just screwed a hook onto the end of a broom handle and it works great! We will do this with the tobacco, as well.
This is the set up. I also use open wire basket drawer things for drying smaller amounts of seed on paper towels.
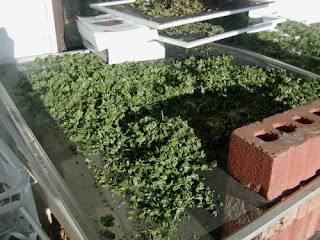
This is parsley, dried and ready for the jar. I plan to keep my dried herbs in sealable glass jars on a shelf in the kitchen. The kitchen is usually the coldest room, in the winter anyway. The heat from the wood stove never reaches it. I have previously kept them in the freezer but will not have room this year.
 I don't wash them before cutting, preferring instead to rinse them with the hose the day before so they are dry and fairly clean when I cut them the next morning. Clean mulch helps to keep them clean when rinsing. I use shredded computer paper for this and it works great!
I still have a lot of herbs to dry yet. Tomorrow I plan to cut a lot of prunella vulgaris (heal all, self heal) to dry and some echinacea, oregano, thyme, cilantro, lavender, St. John's Wort, hibiscus, choc mint, more lemon balm, more mint and a few others. I am going to need more screens!


 I rinsed it and laid it out on a screen for drying. I might hang some herbs to dry this year too. I do have the wire strung under the porch roof just for that purpose but this is drying on a screen. I will turn it a few times every day.


